LocalLLM Local Large Model Translation
If you have some hands-on ability, you can also deploy a large model locally and use it for translation. This guide introduces the deployment and usage methods using Qwen as an example.
1. Download the exe and run it successfully
Open the URL https://ollama.com/download

Click to download. After the download is complete, double-click to open the installation interface, then click Install to finish.

After completion, a black or blue window will automatically pop up. Enter the 3 words ollama run qwen and press Enter. The Tongyi Qianwen model will be downloaded automatically.

Wait for the model download to finish. No proxy is needed, and the speed is quite fast.

Once the model is automatically downloaded, it will run directly. When the progress reaches 100% and the "Success" character is displayed, it means the model is running successfully. At this point, the installation and deployment of the Tongyi Qianwen large model are complete, and it's ready for use. Isn't it super simple?

The default API address is http://localhost:11434
If the window is closed, how do you reopen it? It's also very simple. Open the computer's Start menu, find "Command Prompt" or "Windows PowerShell" (or directly press
Win key + q keyand search for cmd), click to open it, enterollama run qwen, and you're done.


2. Use directly in the command console window
As shown in the figure below, when this interface is displayed, you can actually start using it directly by entering text in the window.


3. Of course, this interface might not be very user-friendly, so let's get a friendly UI
Open the URL https://chatboxai.app/zh and click to download.

After downloading, double-click it and wait for the interface window to open automatically.

Click "Start Setup". In the pop-up layer, click the top "Model", select "Ollama" under "AI Model Provider", fill in the API domain address http://localhost:11434, select Qwen:latest from the model dropdown menu, and then save. That's it.

After saving, the usage interface is displayed. Use your imagination and use it freely.

4. Fill the API into the video translation and dubbing software
- Open the menu -> Settings -> Local OpenAI-compatible large model. Add a model
,qwenin the middle text box. After adding, it should look like the following, then select this model.

- Fill in
http://localhost:11434in the API URL. The SK can be filled in arbitrarily, for example, 1234.
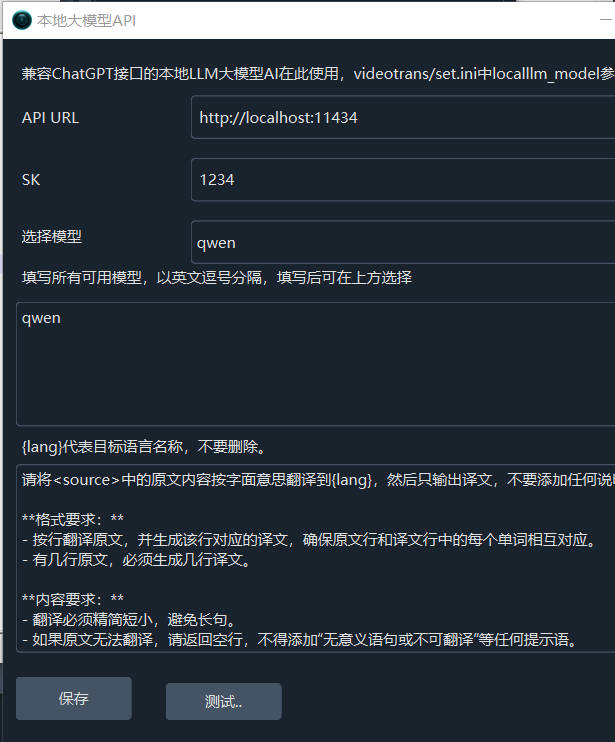
- Test if it's successful. If successful, save it and go use it.
5. Call it in code
Ollama provides an API interface compatible with OpenAI. You can directly use the OpenAI library to call it, just change the model name to qwen.
from openai import OpenAI

client = OpenAI(
    base_url = 'http://localhost:11434/v1',
    api_key='ollama', # required, but unused
)

response = client.chat.completions.create(
  model="qwen",
  messages=[
    {"role": "system", "content": "You are a professional multilingual translation expert."},
    {"role": "user", "content": "Translate the content I send you into English. Only return the translation, do not answer questions, do not confirm, do not reply to this message. Start translating from the next line.\nThe weather is nice today!\nIt's quite sunny and breezy, and we have no class this afternoon.\nThat's really great"}
  ]
)
print(response.choices[0].message.content)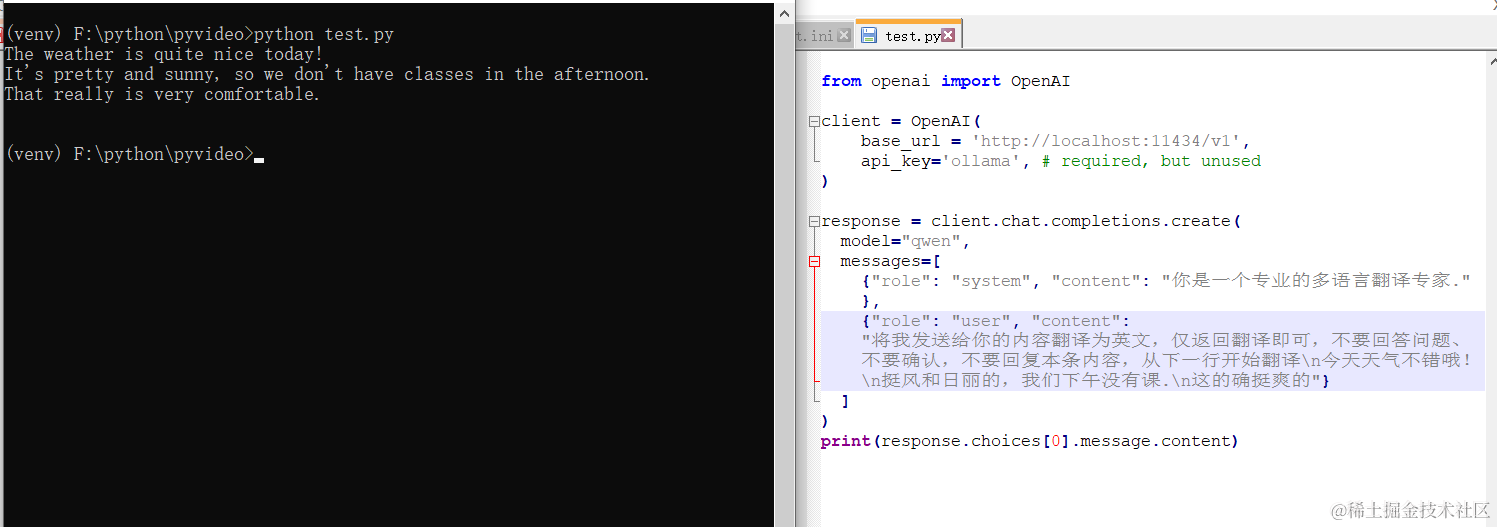
The effect is pretty good!
7. What other models can be used?
Besides Tongyi Qianwen, there are many other models available. The usage method is equally simple, just 3 words: ollama run model_name
Open this address https://ollama.com/library to see all model names. Copy the name of the one you want to use, then execute ollama run model_name.
Remember how to open the command window? Click the Start menu, find Command Prompt or Windows PowerShell.
For example, I want to install the openchat model.

Open Command Prompt, enter ollama run openchat, press Enter, and wait until "Success" is displayed.


Notes:
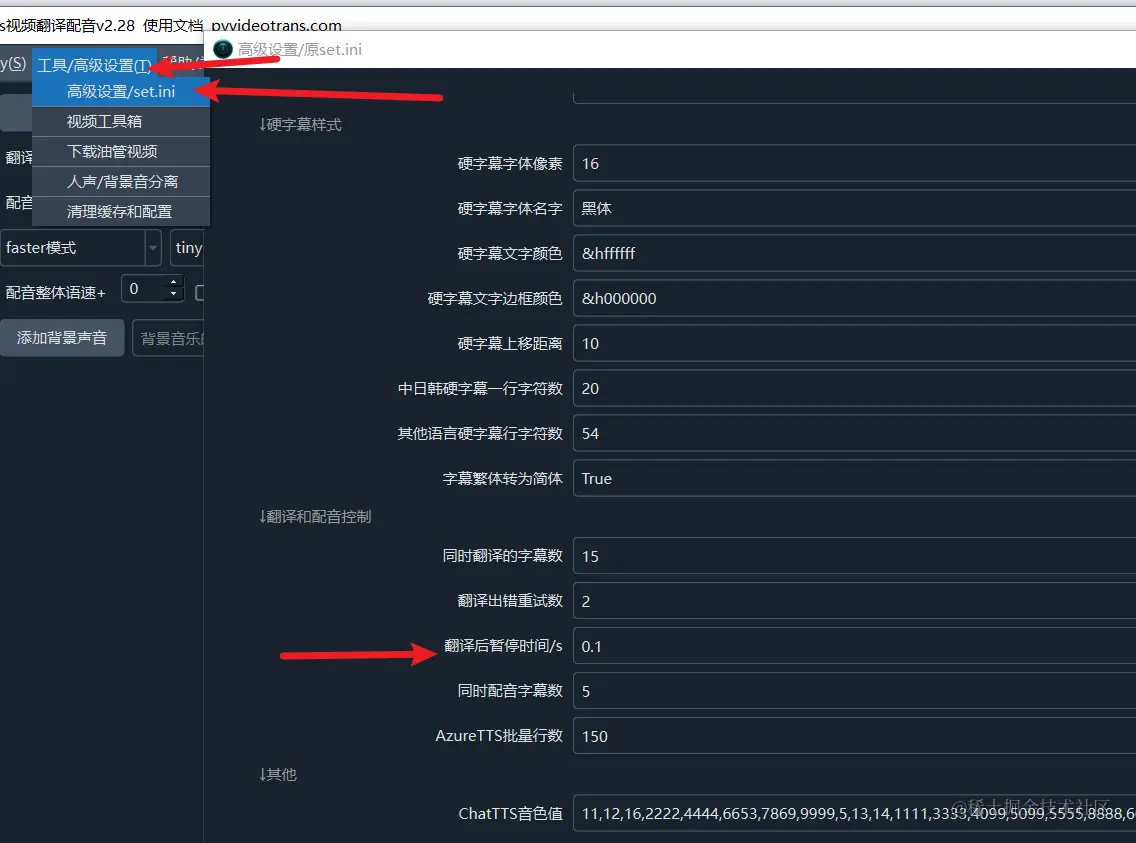
Most AI translation channels may limit the number of requests per minute. If you encounter an error during use indicating the request frequency is exceeded, you can set a number of seconds via the software Menu -> Tools/Advanced Settings -> Advanced Settings/set.ini -> Pause time after translation. For example, set it to 30, meaning wait 30 seconds after each translation before proceeding to the next one, to avoid exceeding the frequency limit and causing errors.