Zero-Dependency, High-Efficiency Speech-to-Text Tool: A Beginner's Guide to whisper.cpp (Including Batch Processing Script)
In the field of speech transcription, OpenAI's Whisper model is undoubtedly the most widely recognized and multilingual option available.
Many excellent derivative projects have emerged around Whisper, such as faster-whisper, and whisperx which supports speaker diarization. And the one we'll introduce in this article: whisper.cpp.
Project URL: https://github.com/ggml-org/whisper.cpp
Why Choose whisper.cpp?
whisper.cpp is a C++ implementation of the Whisper model, and its core advantages are very prominent:
- Almost Zero Dependencies: This is its biggest highlight. Unlike other projects that require installing a bunch of Python libraries via
pip,whisper.cpphas almost no dependencies. You'll never have to worry about falling into the "deep pit" of annoying environment configuration, module installation errors, and version conflicts again. - Excellent Performance: The native performance advantage brought by C++ makes its transcription speed very fast, with relatively low resource usage.
- Cross-Platform & Hardware Support: It runs well on Windows, macOS, and Linux. Even better, it supports various hardware accelerations, from mainstream NVIDIA (CUDA) and AMD (OpenCL) graphics cards, to Apple's Metal framework, and even dedicated NPUs, all can be utilized for further speedup.
- Simple Deployment: You can directly download the officially compiled executable, unzip it, and it's ready to use. The entire program package is very compact.
Of course, it also has one aspect that is not very friendly to beginners: Pure command-line operation.
But don't worry, this article is written to solve this very problem. This guide will take you step-by-step through the entire process from download to usage, and provides a batch processing script customized for Windows users. You just need to copy and paste to achieve one-click transcription of all audio/video files in a folder by double-clicking.
Step 1: Preparation
Before starting transcription, you need to prepare the necessary programs and files.
1. Download the whisper.cpp Main Program
First, download the corresponding pre-compiled version based on your operating system and hardware.
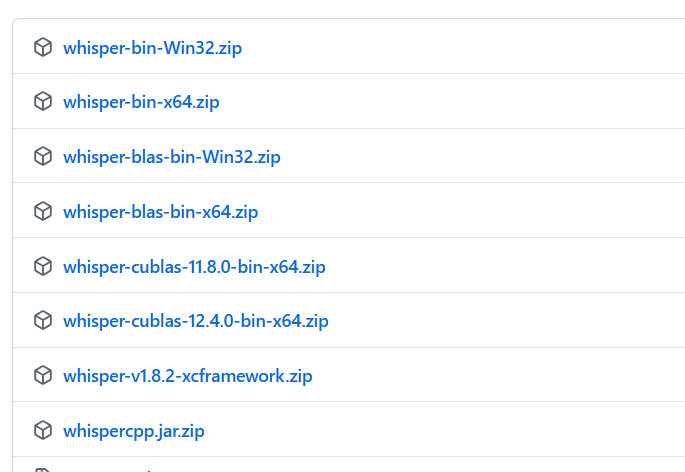
Download URL: https://github.com/ggml-org/whisper.cpp/releases/tag/v1.8.2
How to choose?
- Windows (without NVIDIA GPU): Download
whisper-bin-x64.zip. - Windows (with NVIDIA GPU): Please choose based on your installed CUDA version. For example, if you have CUDA 12.x installed, download
whisper-cublas-12.4.0-bin-x64.zip; if you have CUDA 11.x installed, downloadwhisper-cublas-11.8.0-bin-x64.zip. Using GPU acceleration can greatly improve transcription speed. - macOS Users: Download
whisper-v1.8.2-xcframework.zip.
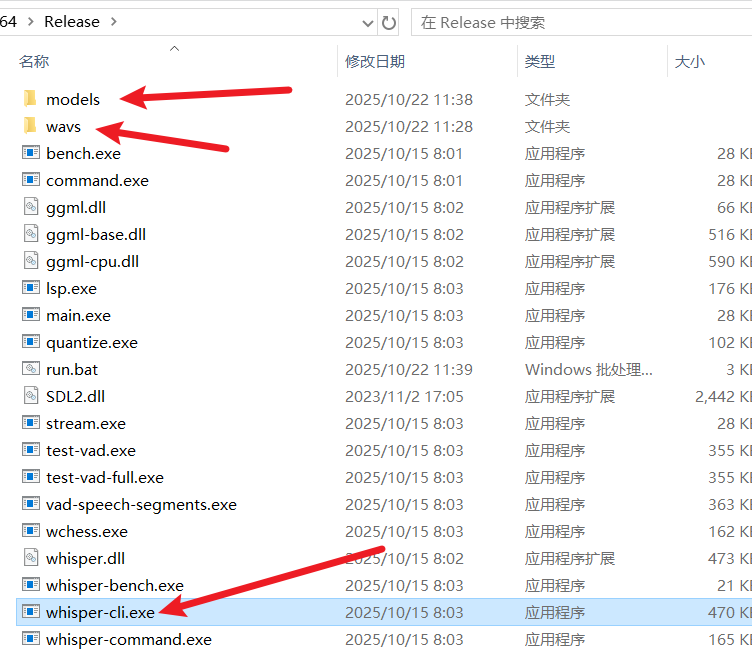
2. Extract and Organize the File Structure
After downloading, extract the zip file. It is strongly recommended to extract it to a short path that does not contain Chinese characters or spaces, such as D:\whispercpp, to avoid many unnecessary troubles.
After extraction, enter the folder and make sure you can see a file named whisper-cli.exe (we will refer to this folder as the whisper.cpp root directory below).
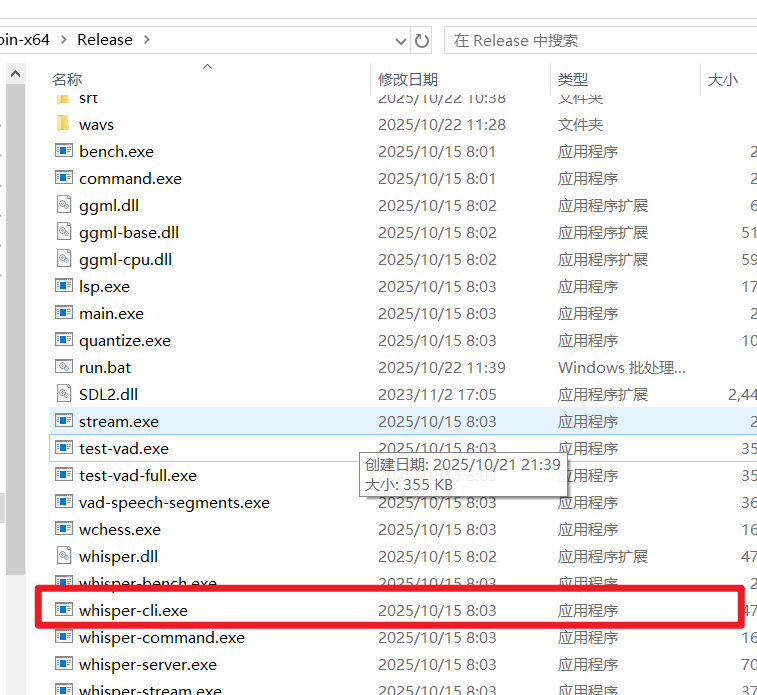
For easy management, let's manually create two new subfolders within this folder:
models: For storing the transcription model files we will download later.wavs: For storing all audio or video files that need to be transcribed.
3. Prepare FFmpeg (Optional but Highly Recommended)
whisper.cpp itself only processes standard format .wav audio files. If your files are in other audio formats like mp3, m4a, or even video formats like mp4, mkv, processing them directly may cause errors or yield blank results.
At this point, we need a powerful tool to help—FFmpeg. It can easily convert files of various formats to the format required by whisper.cpp.
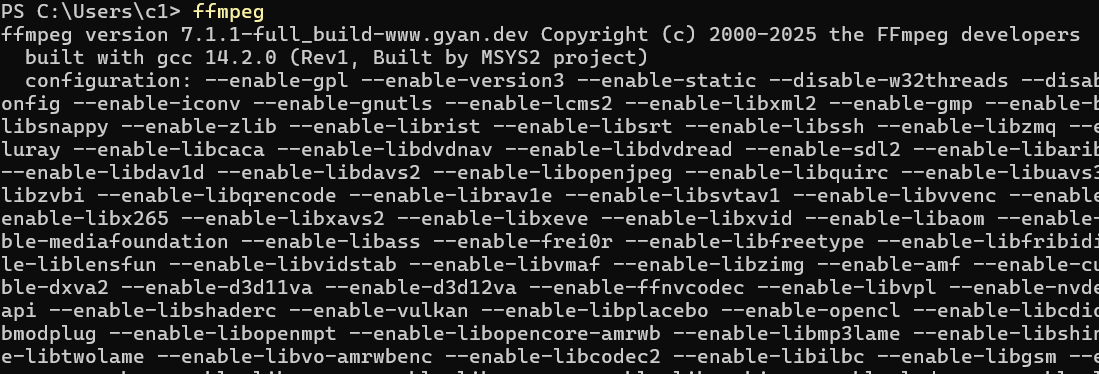
- Check if it's already installed: Open a command prompt (cmd), type
ffmpeg, and press Enter. If a bunch of version information is displayed, it's already installed and the environment variable is configured. If it says "command not found", you need to download it manually.

- Download FFmpeg:
- Lazy Version: The author provides a standalone
ffmpeg.exefile. Download it and place it directly in the same directory aswhisper-cli.exe.https://github.com/jianchang512/stt/releases/download/0.0/ffmpeg.exe
- Official Version: You can also download the latest version from the FFmpeg official website. After extracting, find
ffmpeg.exein thebinfolder and copy it to the same directory aswhisper-cli.exe.
- Lazy Version: The author provides a standalone
4. Download Model Files
Larger models generally offer higher accuracy but require more computational resources and are slower.
Model Download URL: https://huggingface.co/ggerganov/whisper.cpp/tree/main
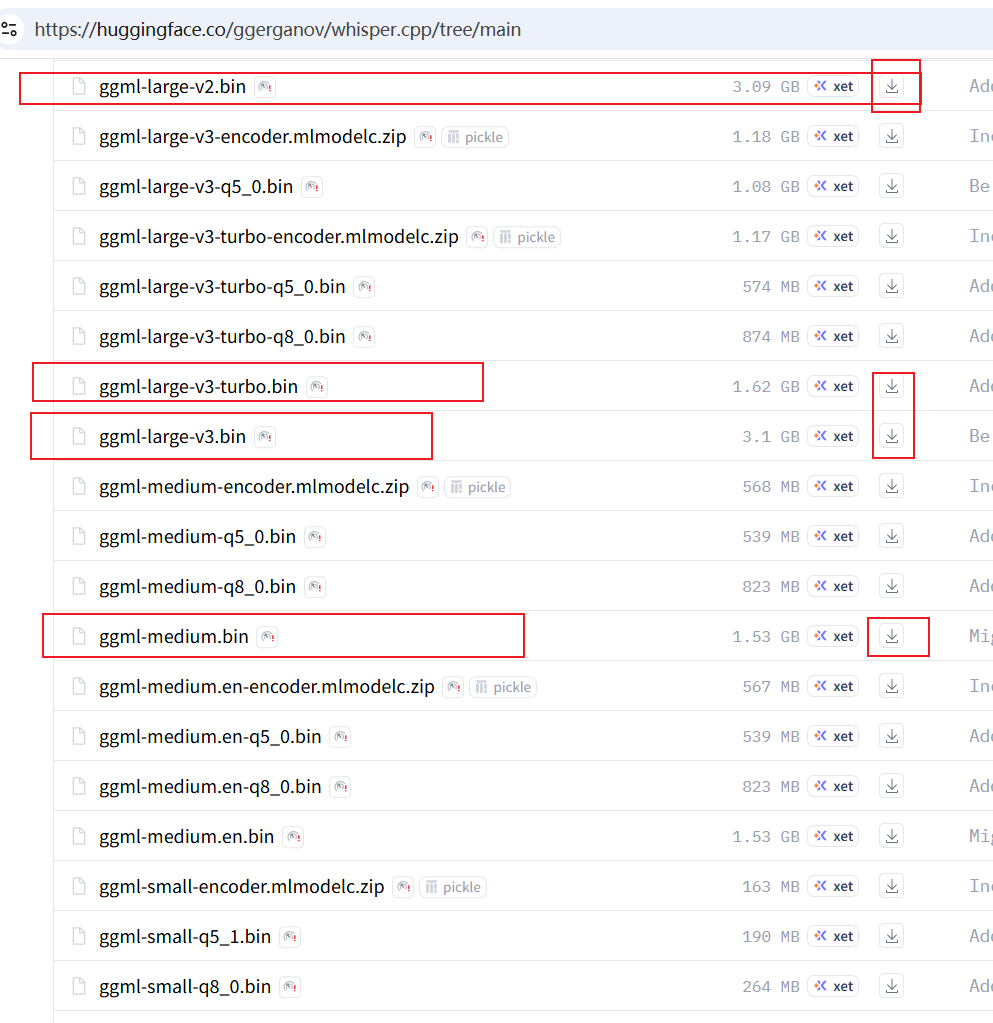
It is recommended to choose from the following models (tiny/base models are too small to be meaningful, and other quantized models are unnecessary):
| Model Name | File Size | Recommended Scenario | Download Link |
|---|---|---|---|
ggml-small.bin | ~488 MB | Lower computer specs, high speed requirement, can accept a few errors. | Click to Download |
ggml-medium.bin | ~1.5 GB | Balanced choice. | Click to Download |
ggml-large-v2.bin | ~3.0 GB | Pursuing high accuracy, good computer specs. | Click to Download |
ggml-large-v3.bin | ~3.1 GB | Highest accuracy, currently the best performing model, recommended for users seeking the ultimate effect. | Click to Download |
ggml-large-v3-turbo.bin | ~1.6 GB | Optimized version of large-v3, faster than v2/v3, accuracy is similar, suitable for most users. | Click to Download |
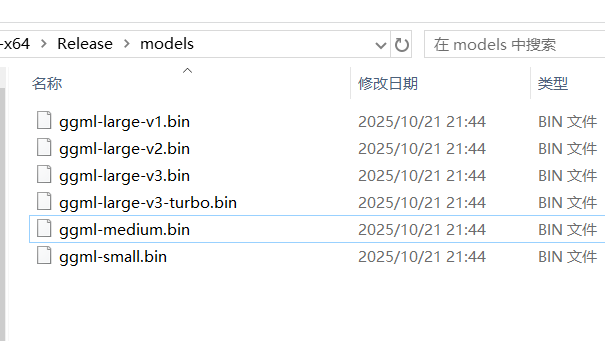
Choose a model you need, download it, and place the downloaded .bin file into the models folder we created earlier.
Step 2: Start Transcribing
With preparations complete, we can now start the actual transcription.
1. Execute Manually Once to Understand the Basic Process
To understand how whisper.cpp works, let's run it manually once.
Open a Command Prompt: Navigate to the folder containing
whisper-cli.exe. Typecmdin the address bar and press Enter. This will directly open a command prompt window in that directory.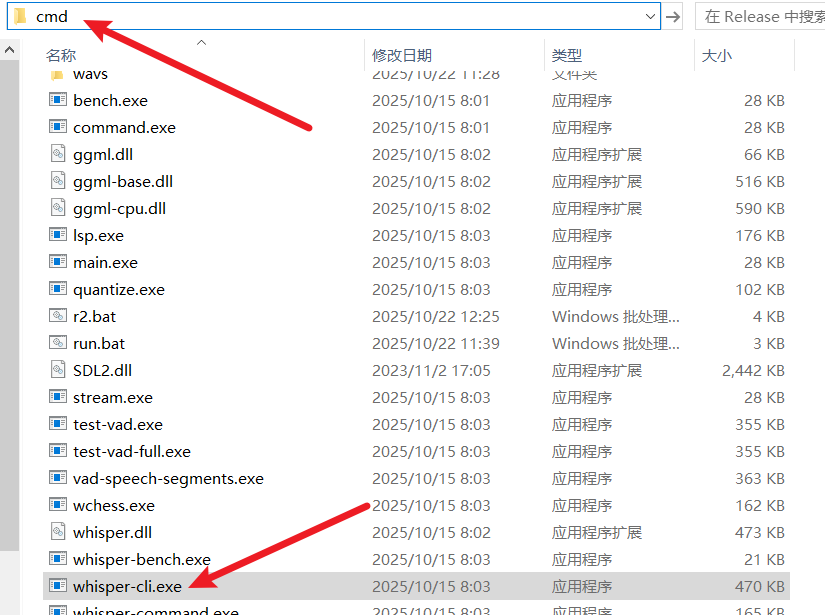
Prepare the Command: The basic command format for
whisper.cppis:whisper-cli [parameters] -f [your audio file path] -m [your model file path]Let's construct a specific example. Assume:
- The file to transcribe,
60.wav, is on the desktop, with the full pathC:\Users\c1\Desktop\60.wav. - The model used is
ggml-small.bin. - We want to auto-detect the language and output an SRT subtitle file.
Then, the final command is:
whisper-cli -np -f "C:\Users\c1\Desktop\60.wav" -l auto -m models/ggml-small.bin -osrt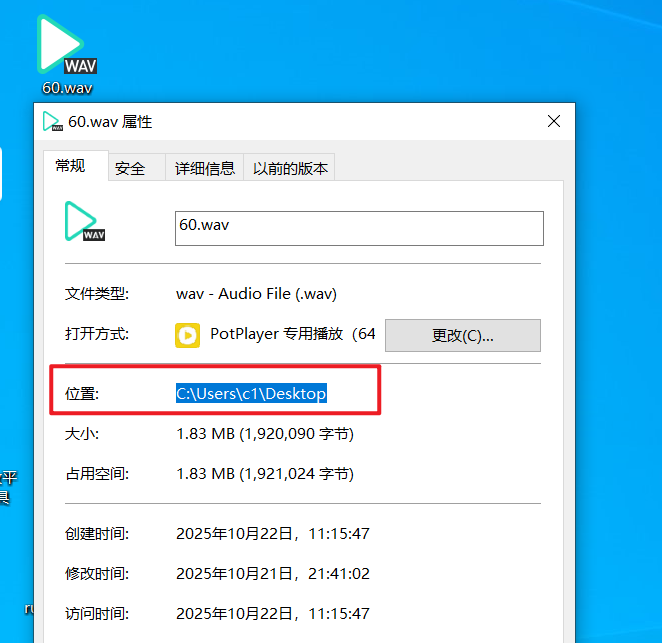
Command Parameter Explanation:
- The file to transcribe,
| Parameter | Purpose | Notes |
|---|---|---|
whisper-cli | Main Program | This is the core file we execute for transcription. |
-np | No Progress | Do not show the real-time progress bar. This makes the output cleaner when running in a script. |
-f "file path" | File | Specifies the input file to transcribe. If the path contains spaces, be sure to enclose it in double quotes. |
-l auto | Language | Specifies the language. auto means auto-detect. You can also specify explicitly, e.g., zh (Chinese), en (English). |
-m models/... | Model | Specifies the path to the model file to use. |
-osrt | Output SRT | Indicates outputting subtitle files in .srt format. |
Execute the Command: Paste the above command into the
cmdwindow and press Enter.
The program will start running. After it finishes, you will see a newly generated
60.wav.srtsubtitle file in the source file's directory (the desktop in this example).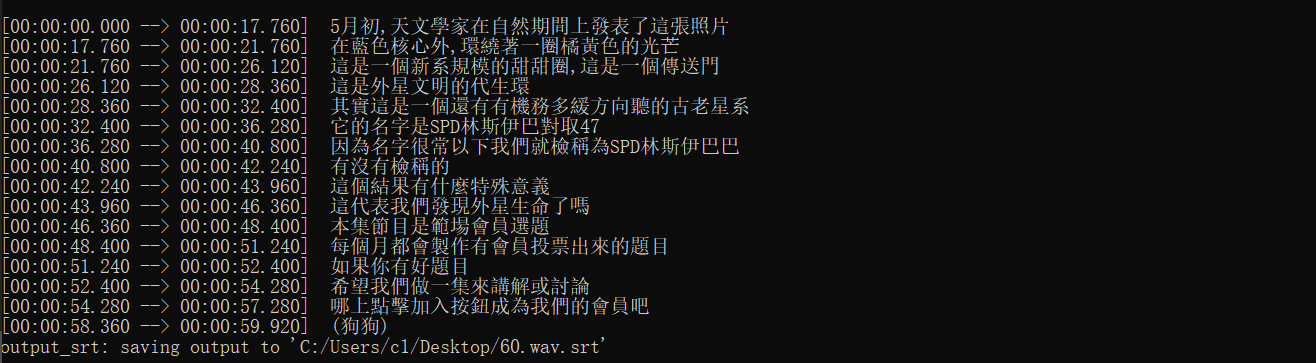
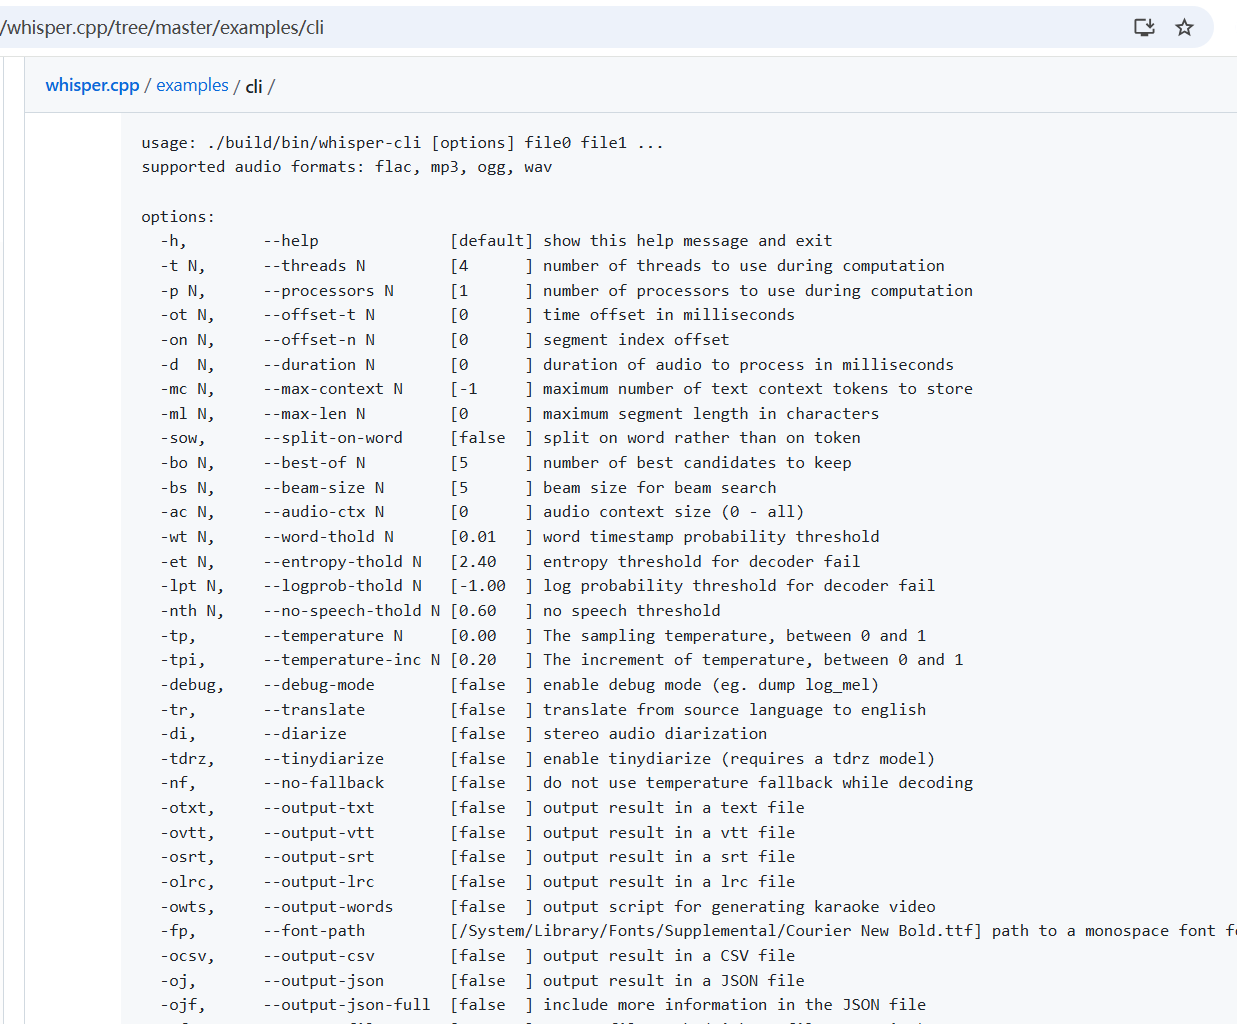
whisper.cppactually has many more advanced parameters for finer control. Interested friends can delve deeper into the official documentation. For daily use, mastering the above few is sufficient.More command parameters: https://github.com/ggml-org/whisper.cpp/tree/master/examples/cli
2. Use the BAT Script for One-Click Batch Processing
Manually entering commands is not only inefficient but also error-prone. To solve this, I have prepared a Windows Batch (.bat) script for you. It can automatically do the following:
- Traverse all files in the
wavsfolder. - Use FFmpeg to automatically convert non-
.wavformat audio/video to temporary.wavfiles. - Call
whisper.cppfor transcription. - Save the generated
.srtsubtitle files uniformly in thesrtfolder. - Automatically clean up temporary files.
Operation Steps:
Create the Script File: In the directory where
whisper-cli.exeis located, right-click to create a new text document and name itrun.txt.Paste the Code: Double-click to open
run.txt, copy all the code below, and paste it in.bat@echo off set model_name=ggml-large-v3-turbo.bin setlocal enabledelayedexpansion cd /d "%~dp0" if not exist "srt\" mkdir "srt" set "audio_ext=.wav" if not exist "models/%model_name%" ( echo. echo ================================================================= echo [Error] Model file does not exist: models/%model_name% echo. echo Please confirm you have downloaded the model and placed it in the models folder. echo If the model filename is different, please modify line 2 of this script: "set model_name=..." echo. echo Model download URL: https://huggingface.co/ggerganov/whisper.cpp/tree/main echo ================================================================= echo. pause exit /b 1 ) echo =============================================== echo Starting batch transcription of all files in "%~dp0wavs"... echo Results will be saved to "%~dp0srt" folder. echo Current model: %model_name% echo =============================================== echo. :: Loop through all files (*.*) in the wavs folder FOR %%F IN (wavs\*.*) DO ( set ext="%%~xF" set sttwav="%%F" set temp_wav="" echo. echo ----------------- Processing file: "%%~nxF" ----------------- rem If format is not wav, use ffmpeg to convert echo !audio_ext! | findstr /i /c:"!ext!" >nul if !errorlevel! neq 0 ( set temp_wav="wavs\temp_%%~nxF.wav" echo [-] "%%F" is not a standard WAV audio, converting using FFmpeg... ffmpeg -y -i "%%F" -ac 1 -ar 16000 -c:a pcm_s16le "!temp_wav!" >nul 2>&1 if !errorlevel! equ 0 ( echo [+] FFmpeg conversion successful! set sttwav="!temp_wav!" ) else ( echo [X] Error: File "%%~nxF" failed FFmpeg conversion, skipped. set sttwav="" ) ) if not !sttwav! == "" ( echo [-] Calling whisper.cpp for transcription... set temp_log="temp_%%~nxF.log" whisper-cli.exe -np -f !sttwav! -l auto -m models/%model_name% -osrt -of "srt\%%~nF" > !temp_log! 2>&1 findstr /i /c:"error:" !temp_log! >nul if !errorlevel! equ 0 ( echo [X] Error: File "%%~nxF" transcription failed, please check the log for details. ) else ( echo [OK] Success: File "%%~nxF" transcription completed, subtitle saved as "srt\%%~nF.srt" ) del !temp_log! if not !temp_wav! == "" ( del !temp_wav! ) ) echo -------------------------------------------------------------------- ) echo. echo =============================================== echo All files processed! echo Results are all saved in the "%~dp0srt" folder. echo =============================================== echo. pauseChange the File Extension: Save and close
run.txt. Then, change the file extension from.txtto.bat. The final filename should berun.bat.Important Note: If your computer does not show file extensions, please first enable "Show file extensions" in Folder Options. Otherwise, you might mistakenly name it
run.bat.txt.
If after modification, double-clicking the file still opens it with Notepad, it means you haven't successfully changed the extension. Make sure there is no
.txtat the end of the filename.
Configure the Model: Right-click the
run.batfile and select "Edit". You will see the second line of code is:set model_name=ggml-large-v3-turbo.binYou can change this to the filename of any model you downloaded and want to use. For example, if you want to use the
large-v3model, change it to:set model_name=ggml-large-v3.bin
Save after making the change.
Start Batch Transcription:
- Copy or move all your audio and video files that need transcription into the
wavsfolder. - Double-click to run the
run.batscript. - A black command prompt window will pop up, and the script will automatically start processing files. You just need to wait for it to finish.
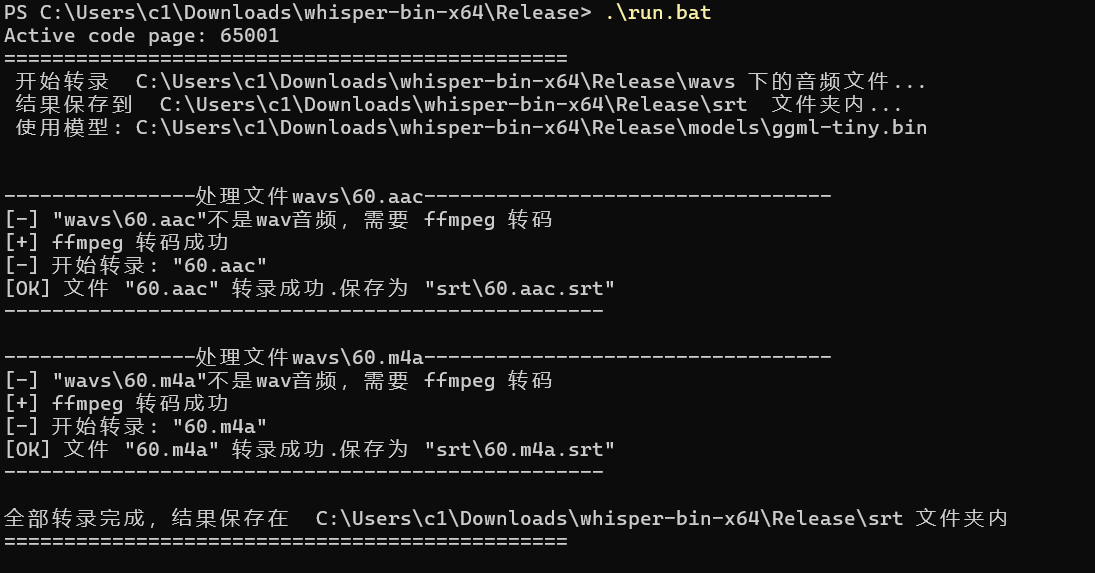
Script Run Example
- Copy or move all your audio and video files that need transcription into the
When the window displays "All files processed!", you can close it. Now, go check the srt folder. Are all the subtitle files generated?
Step 3: Script Code Explanation (Optional Reading)
For friends who want to understand how the script works, here's a simple explanation of the core code:
@echo off: Turns off command echoing, making the window output cleaner.set model_name=...: Defines a variablemodel_name, making it easy for us to centrally modify the model at the beginning of the script.cd /d "%~dp0": Changes the current directory to the directory where the script is located, ensuring subsequent commands execute in the correct path.if not exist "srt\" mkdir "srt": Checks if thesrtfolder exists. If not, creates one.if not exist "models/%model_name%": Checks if the specified model file exists. If not, reports an error, exits, and provides the model download URL.FOR %%F IN (wavs\*.*) DO (...): This is a loop statement. It iterates through every file in thewavsfolder, assigns the filename to the variable%%F, and then executes the code block afterDO.if !errorlevel! neq 0 (...): This section contains the logic for judging file format and calling FFmpeg.!errorlevel!is the return status code of the previous command, where0means success, and non-0means failure. Here, a small trick is used to check if the file extension is.wav. If not, theffmpegcommand is called for conversion.ffmpeg -y -i "%%F" -ac 1 -ar 16000 ...: This is the FFmpeg conversion command. The parameter meanings are:-y: Overwrite the output file if it already exists.-i "%%F": Specifies the input file.-ac 1: Sets audio channels to mono.-ar 16000: Sets the sample rate to 16000 Hz.-c:a pcm_s16le: Sets audio encoding to 16-bit PCM. These are the most recommended audio specifications for Whisper.
whisper-cli.exe ...: Calls the core transcription program, similar to when we executed it manually.del !temp_wav!: After transcription is complete, deletes the temporary.wavfile generated by FFmpeg to keep the directory tidy.pause: Pauses at the end of script execution, waiting for the user to press any key to close the window. This allows us to see the final execution result clearly.
At this point, you have successfully set up a local, efficient, free, and dependency-free speech-to-text workflow. With the powerful performance of whisper.cpp and the batch processing script we provided, tasks like organizing meeting notes, creating video subtitles, or converting learning materials will become exceptionally simple.