🗣️ Build Your Own Real-Time Speech Transcription Tool
Real-time speech-to-text, such as for meeting minutes, class notes, or interview transcripts, is now very common and a hot topic that interests many people.
So, would you like to deploy an open-source, fun real-time transcription project — WhisperLiveKit? It allows you to easily set up a real-time speech recognition system on your own computer!
💡 First, the conclusion: Who is it for?
WhisperLiveKit is perfect for learning and experiencing the principles and workflow of AI real-time speech recognition. However, a heads-up: It cannot yet fully replace professional commercial products, but it's already very interesting and quite powerful.
Advantages:
- 🚀 Super simple to deploy
- 💻 Comes with a web interface to directly experience cutting-edge technology
Points to note:
Latency Issues Models with high Chinese recognition accuracy (like
large-v2/v3) are relatively slow. The speech-to-text delay might be over 10 seconds, or even longer. If your computer has an NVIDIA GPU (recommended 12GB VRAM or more), it will be much faster. Smaller models are faster, but Chinese recognition is not accurate enough.Network Environment The program needs to download a very large core model file, which is hosted outside the firewall. 👉 Therefore, you need to have your "scientific internet access" tool ready in advance.
🧰 Step 1: Preparation (Sharpen the axe before chopping the wood)
Before starting, please make sure your computer has the following ready:
Install
uvThis is a modern Python package management tool. It can install all dependencies with "one command," which is extremely convenient.If you haven't installed it yet, you can check my previous tutorial.
Install
ffmpegIt's the "Swiss Army knife" of audio/video processing. Our program relies on it to read microphone audio.Similarly, if not installed, you can also refer to the previous article.
Enable Network Proxy ⚠️ This is very important! Because the model file needs to be downloaded from servers outside the firewall, please be sure to enable "scientific internet access," and set it to "global proxy" or "system proxy" mode.
⚙️ Step 2: Install the Core Program
Create a new folder, for example:
D:/python/livekitOpen this folder, type
cmdin the address bar, and press Enter. You will see a black command-line window 👇
Copy the command below into it, then press Enter to execute:
uv init && uv add whisperlivekit faster-whisper --index https://pypi.tuna.tsinghua.edu.cn/simple💡 This command will:
- Use
uvto automatically install WhisperLiveKit and the acceleration dependencyfaster-whisper- And accelerate downloads via the Tsinghua mirror source

Waiting for installation... ⏳ 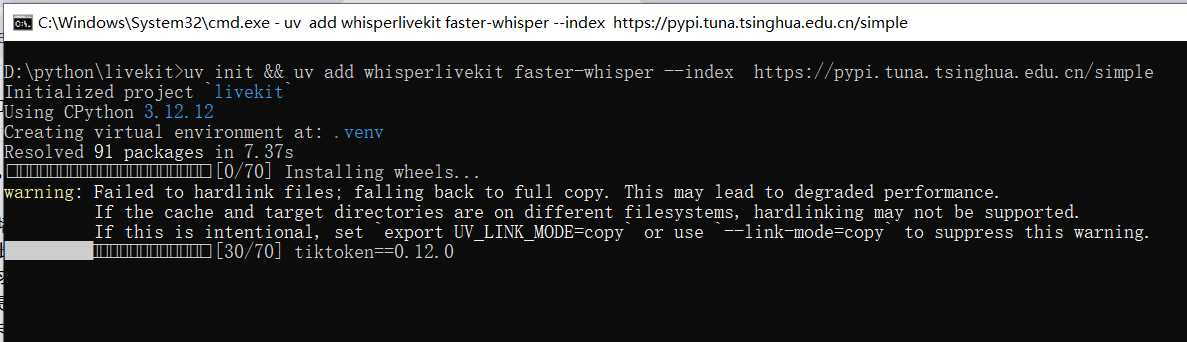
When you see the interface below, it means the installation is successful! 🎉 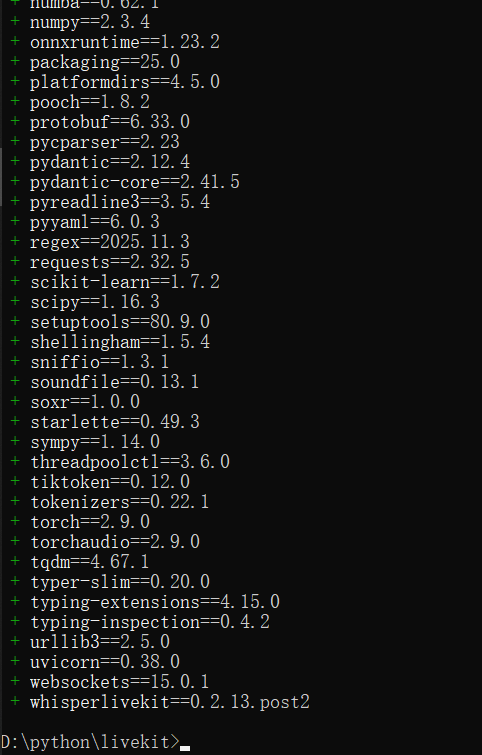
🚀 Step 3: Start the Real-Time Transcription Service
Continue executing the following command in the command-line window:
uv run whisperlivekit-server --audio-max-len 10 --frame-threshold 20 --model large-v3-turbo --language zhParameter Explanation:
--model large-v3-turbo: Use the fasterlarge-v3-turbomodel (much faster than large-v2/v3, with slightly lower accuracy)--language zh: Specify recognition for Chinese
⚠️ The first run will automatically download the model file, which is large. Please ensure a stable network connection and be patient.

When the window shows the URL in the image below, congratulations! 🎉 The service started successfully! 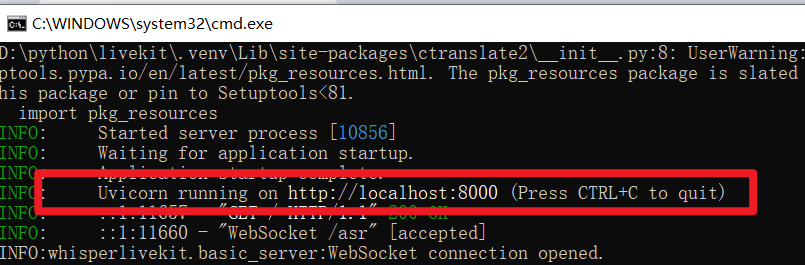
🌐 Step 4: Start Using It!
Open a browser (Chrome or Edge recommended) and visit the address:
👉 http://localhost:8000/
You will see a clean web interface 👇 
Click the big red button to allow the browser to access the microphone. Then start speaking, wait a few seconds, and the recognized text will appear on the screen! 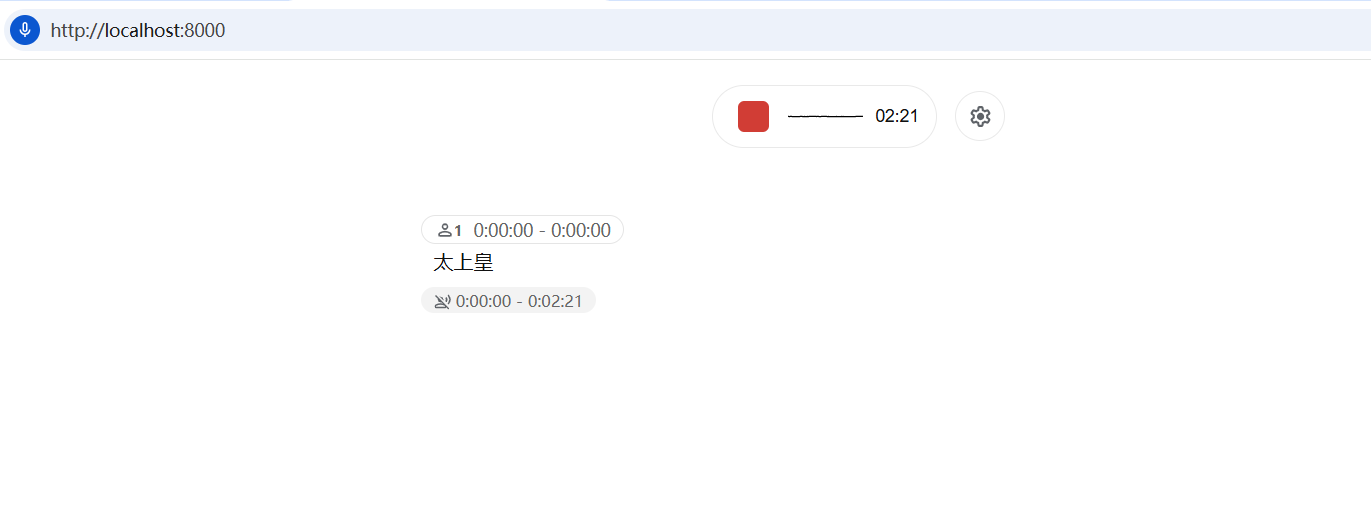
🧩 Common "Crash" Scenarios and Solutions
Don't worry, here are the most common errors:
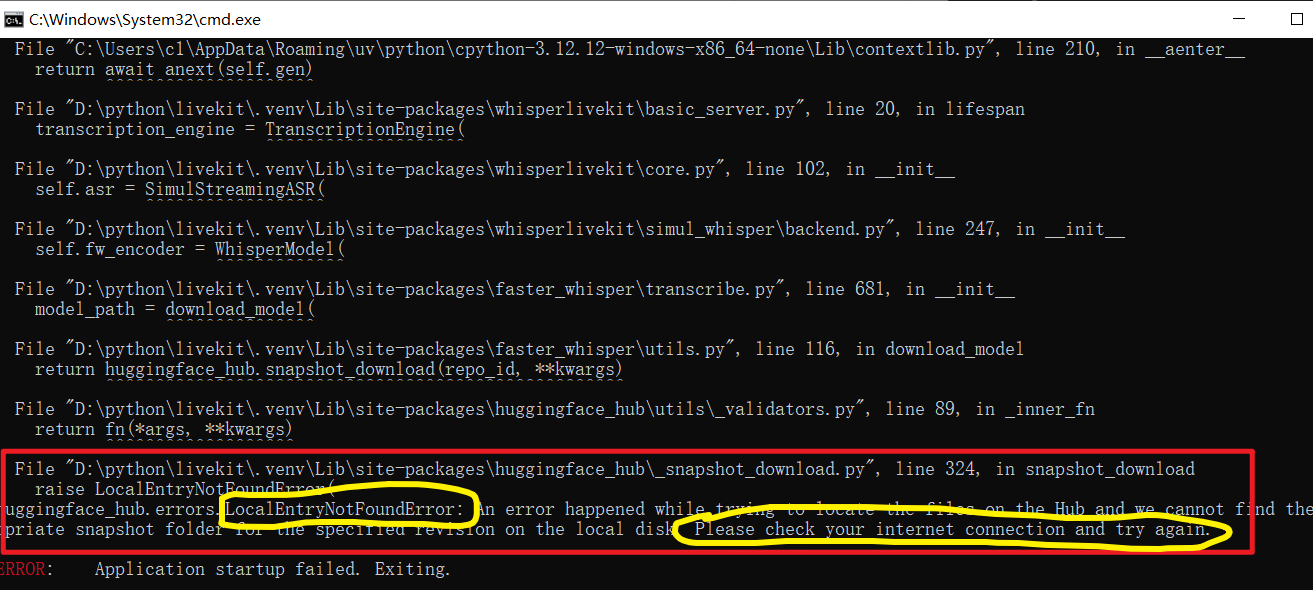
❌ Model Download Failed If the error message contains words like "huggingface," "download," "timeout," it's almost always because the proxy is not enabled or not set to global mode.
❌
uvNot Found Meansuvis not installed properly or not added to the system environment variables.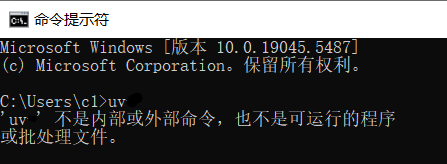
❌
ffmpegNot Found Similarly, check if it's installed correctly and the environment variables are configured.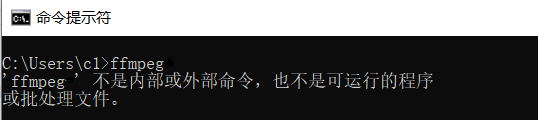
💤 Lazy Person's Bonus: One-Click Startup Script!
Typing commands every time is too troublesome? Then here's a "one-click startup"!
- In the project folder (
D:/python/livekit), create a new text document. - Copy the following content into it:
@echo off
call uv run whisperlivekit-server --audio-max-len 10 --backend faster-whisper --frame-threshold 20 --model large-v3-turbo --language zh
pause- Click "File" → "Save As," select All Files for the save type, name it
start.bat, and then save. - ⚠️ Make sure the filename ends with
.bat(not.bat.txt)!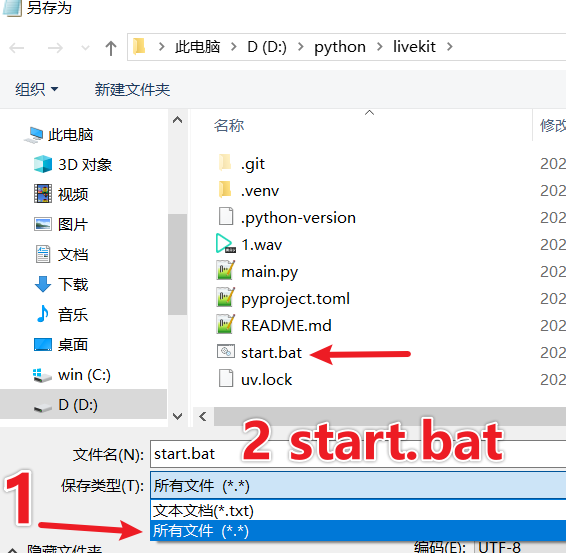
From now on, you just need to double-click the start.bat file to start the service with one click~ No more typing long commands every time, easy and efficient!
🎉 Congratulations on completing the deployment! From now on, you can achieve real-time speech recognition on your own computer. WhisperLiveKit is a project very suitable for learning and demonstration. Feel free to try different models and parameters to explore more of its capabilities!