What is uv?
Before we start the installation, let's briefly understand uv. uv is an extremely fast Python package and project manager written in Rust. It's excellent for installing and managing open-source AI projects based on Python.
Preparation: Choosing an Installation Method
We provide two methods for installing uv on Windows. You can choose one based on your preference.
- Method 1: Automatic Installation via PowerShell (Recommended) - This is the simplest and fastest method, completing installation and configuration with a single command.
- Method 2: Manual Download and Configuration - Choose this method if Method 1 encounters issues, or if you want more control over the file location.
Method 1: Automatic Installation via PowerShell (Recommended)
PowerShell is a powerful command-line tool built into the Windows system. We'll use it to run the official installation script.
Step 1: Open PowerShell
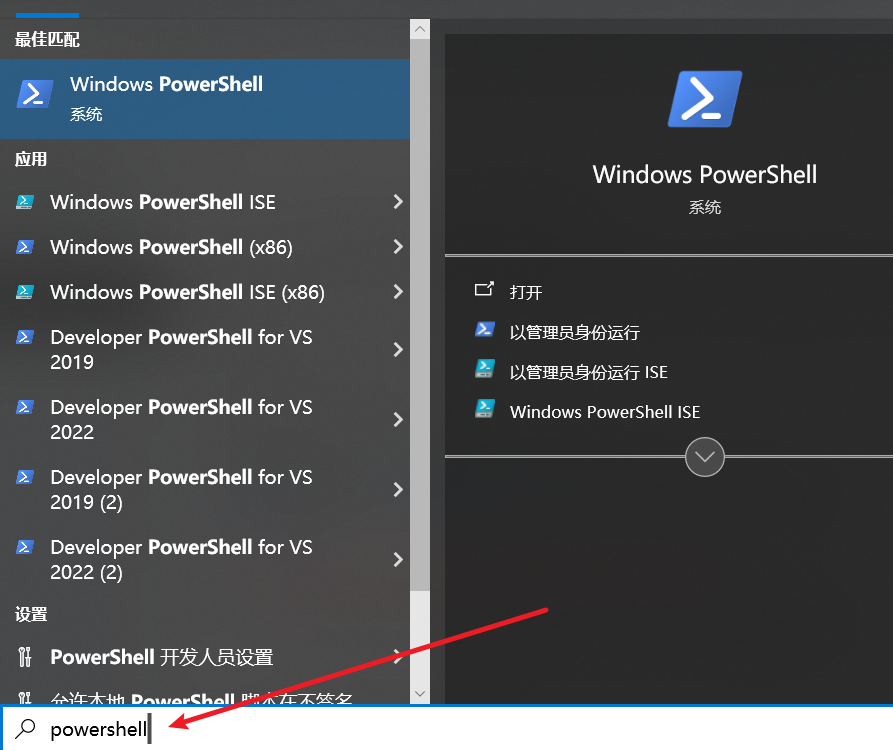
You need to find and open PowerShell.
- Click the Start Menu (Windows icon) in the bottom-left corner of your screen.
- Find the
Windows PowerShellfolder in the app list, or simply typePowerShellin the search box (Press the Windows key + Q, then typepowershellto search).
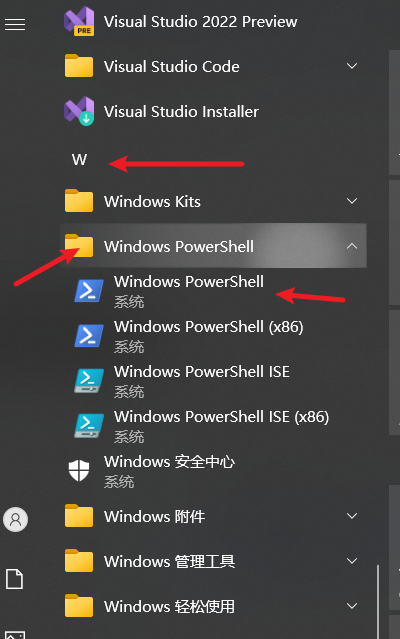
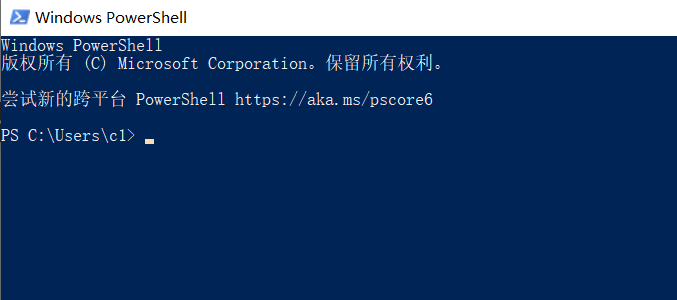
- Click Windows PowerShell to open it. You will see a window with a blue background.
Step 2: Copy and Execute the Installation Command
Use your mouse to completely copy the following command:
powershellpowershell -ExecutionPolicy ByPass -c "irm https://astral.sh/uv/install.ps1 | iex"Go back to the PowerShell window you just opened, right-click with your mouse, and the copied command will be automatically pasted.
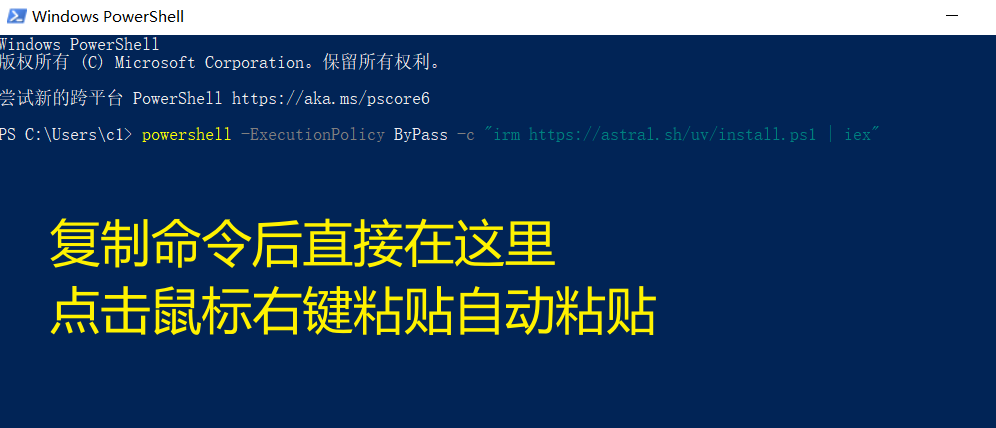
- Press the Enter key on your keyboard.
The script will automatically download uv and configure everything for you. During installation, you might see some progress bars and text messages; this is normal.
💡 Command Explanation: This command starts a new PowerShell process, then downloads and immediately executes the installation script from the official uv address. This method is very safe and won't affect your computer's overall settings.
Step 3: Verify the Installation
After installation, we need to verify if uv was installed successfully. You must open a new PowerShell or CMD window to perform the verification, as changes to environment variables only take effect in new windows.
- Press the Windows key + R on your keyboard to open the "Run" dialog.
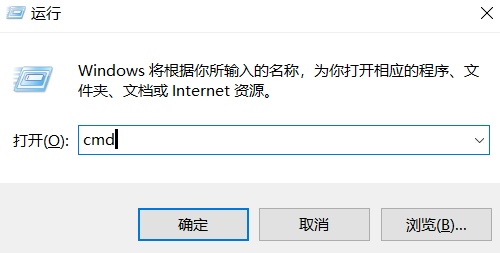
Type
cmdand press Enter to open a black Command Prompt window.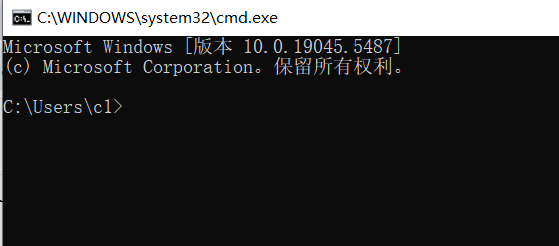
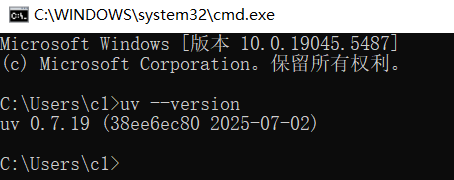
In the window, type the following command and press Enter:
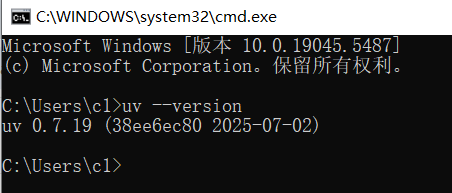
cmduv --versionIf you see version information similar to the following, congratulations, the installation was successful! (The version number may differ)
uv 0.7.19 (38ee6ec80 2025-07-02)
Method 2: Manual Download of the exe File
If the PowerShell method fails due to network or other reasons, you can try manual installation. This process is slightly more complex, but you can complete it by following the steps.
Step 1: Download the uv Program File
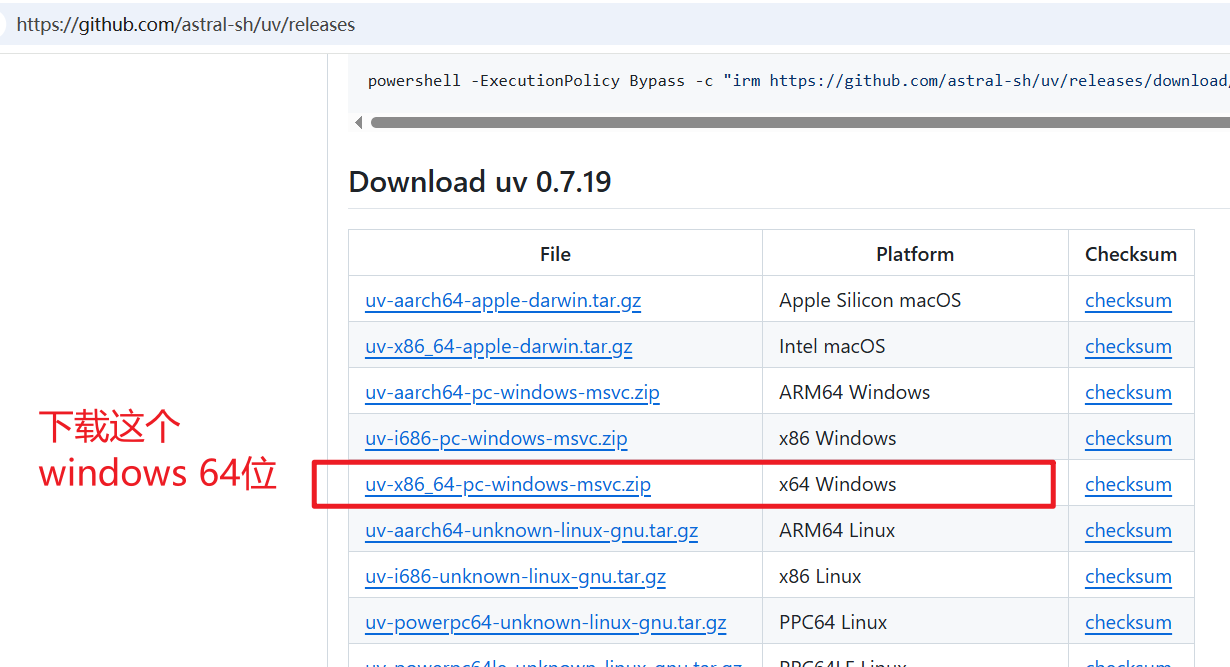
Open your browser and visit the
uvGitHub releases page: https://github.com/astral-sh/uv/releasesOn the page, find the latest version and locate the file named
uv-x86_64-pc-windows-msvc.zipto download.
Step 2: Extract and Store the Files
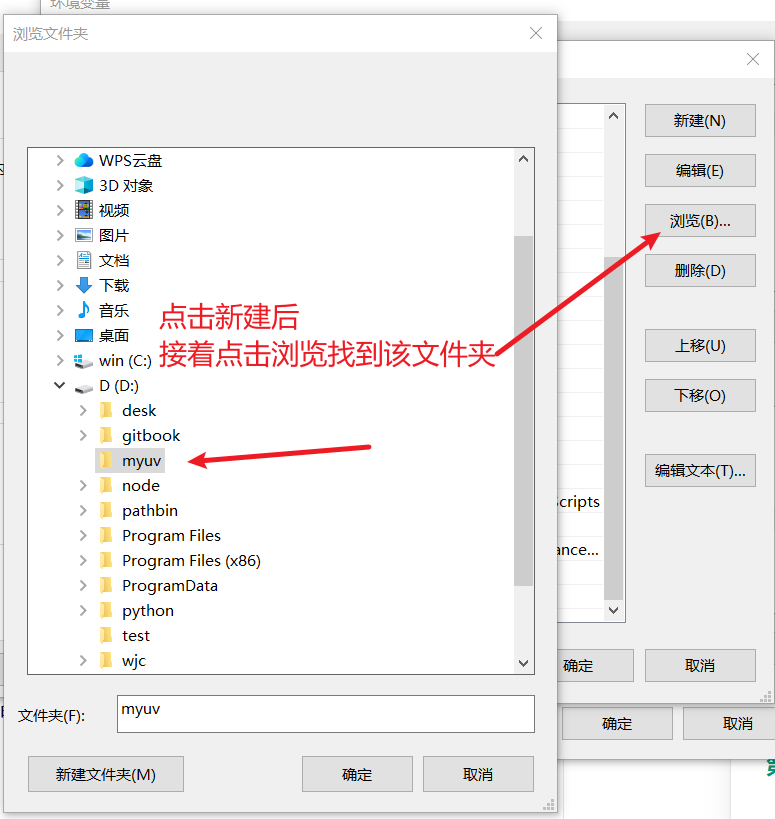
- After downloading, find the
.zipfile, right-click on it, and select "Extract All". - You need to choose a permanent location for the extracted files. Do not leave them in temporary folders like "Downloads" or the Desktop. A good suggestion is to create a dedicated folder in the root directory of your D: or C: drive. For example, let's create a folder named
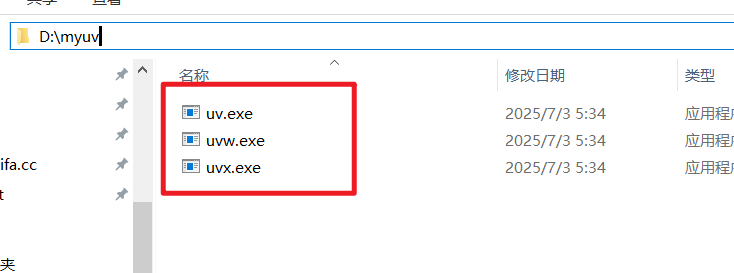
myuvon the D: drive (D:\myuv). - Move the three extracted files,
uv.exe,uvx.exe, anduvw.exe, into theD:\myuvfolder you just created.
Step 3: Configure the System Environment Variable
This is the most critical step. We need to tell Windows where to find the uv.exe program.
- Find the "This PC" (or "Computer") icon on your desktop, right-click on it, and select "Properties".
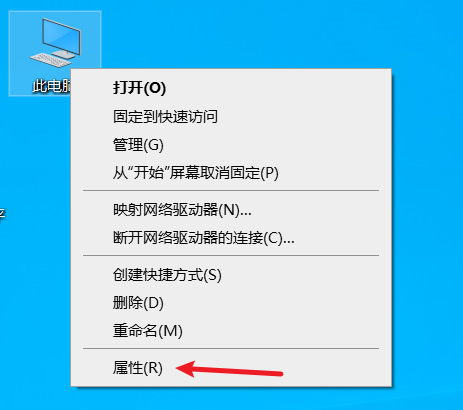
In the window that opens, find and click "Advanced system settings".
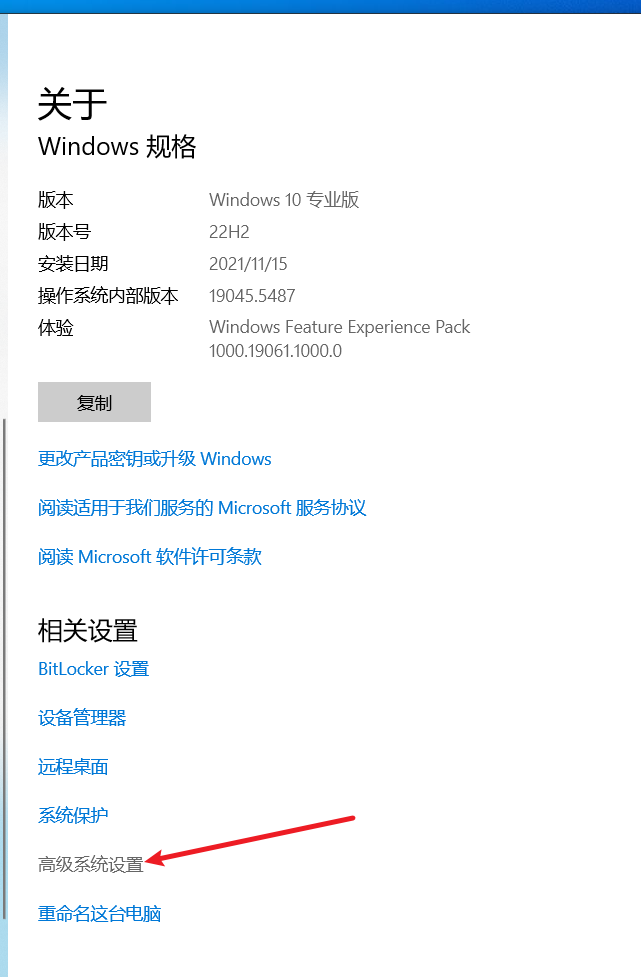
In the "System Properties" window that pops up, click the "Environment Variables" button at the bottom.

- In the "Environment Variables" window, find the "System variables" section in the lower half. Locate the variable named
Path, click on it to select it, then click the "Edit" button.

- In the "Edit environment variable" window that pops up, click the "New" button in the top-right corner.
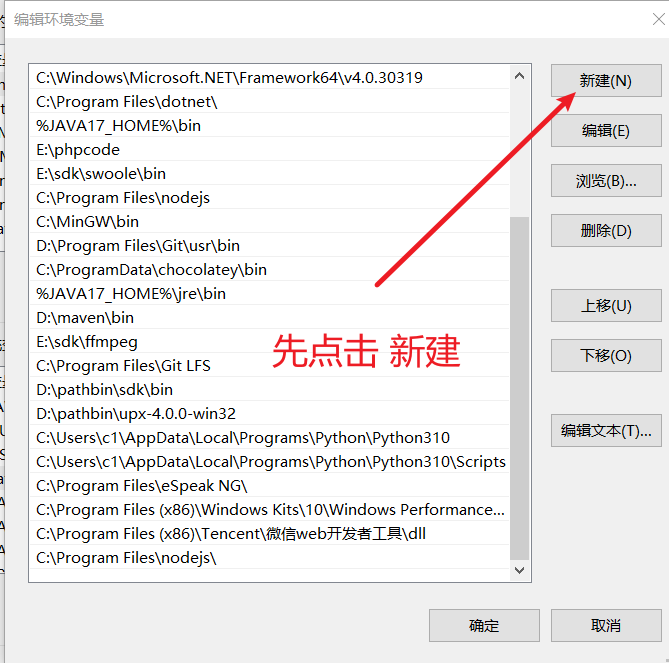
- A new line will appear. Type in the folder path where you stored
uv.exe(e.g.,D:\myuv). To avoid typing errors, you can also click the "Browse" button and manually navigate to that folder.
- After entering the path, click "OK" all the way to close all the settings windows you just opened.
Step 4: Verify the Installation
Just like in Method 1, we need to open a new terminal window to verify.
- Press Windows key + R, type
cmd, and press Enter. - In the black Command Prompt window, type
uv --versionand press Enter. - If the version number is displayed successfully, your manual installation and configuration are complete!
Troubleshooting: Common Issues
Q: I typed uv --version, but it says 'uv' is not recognized as an internal or external command, operable program or batch file. Why?
A: This almost always means environment variable configuration failed or you didn't reopen the terminal window.
- Check the Path: Carefully repeat Step 3 of Method 2. Ensure the path you added to the
Pathvariable is completely correct and exactly matches the folder where you storeduv.exe. - Restart the Terminal: Changes to environment variables only take effect in newly opened command-line windows. Be sure to close all open PowerShell or cmd windows and open a new one before trying again.
Q: What should I do if I see red error messages during PowerShell installation?
A: This is usually because your computer's security policy is blocking script execution.
- Run as Administrator: First, try right-clicking the PowerShell icon and selecting "Run as administrator", then execute the installation command again.
- Change Execution Policy: If errors persist even in administrator mode, you can change the execution policy first. In PowerShell running as administrator, type the following command and press Enter:powershell
Set-ExecutionPolicy RemoteSigned -Scope CurrentUser
The system will ask if you want to make the change. Type A and press Enter to confirm. This command allows running local scripts and remote scripts from trusted publishers, striking a good balance between security and convenience. After completing this, re-run the uv installation command.